Increase Coverage with the Test Expert Nail Status Report

If you’ve been using Test Expert for awhile, you are likely familiar with the status.asc text report. Test Expert now includes a graphical Nail Status Report which displays an interactive accessibility report listing all non-accessible nets and the reason for the inaccessibility. Simply click on a net in the report and the net is highlighted in the Test Expert main view. This makes it quite easy to identify the causes for non-access and increase your test coverage.

There is a lot of information in the report, so we’ve created this handy chart to help you navigate all the details and improve your test coverage. Feel free to print it out for quick reference!

Download the Test Expert Nail Status Legend here.

As always, if you have any questions, feel free to contact us using our support request form, or by calling 855-642-2848 (option 2).

Thanks for reading!

Licensing Tips Part 2: Replace License File

Did you recently get an updated UniCam license file with new features (or removal of options) or do you need to restore the license after a server crash/repair? If so, read on and follow these steps to replace your existing license file. It’s fairly simple to accomplish and should only take a few minutes before your team is up and running again. 

If you did the initial license install, most of this will be familiar to you.  You can also read Part 1 for a refresher. Please note that you will need your webkey log-in information to update your license.

Steps to Replace UniCam License File

  1. Open the Control Panel from your Start Menu
  2. Open Administrative Tools
  3. Open Services
  4. Find and select the Unicam Security and Licensing Service
  5. Stop the service by clicking the Stop button under the menu bar at the top or by right clicking on the service listing and selecting Stop.
  6. Go to the Siemens GTAC website (http://support.industrysoftware.automation.siemens.com)
    1. Log in using your Webkey information
    2. Licensing Management->
    3. Current License->
    4. Enter your Sold-To ID (if requested)
    5. Click Passwords and License File
    6. Select “Unicam products” from the Product drop list field and click Continue
    7. Upload your Challenge.nlc file when prompted. Locate your “Challenge.nlc” file in the folder where you installed the license server, (by default “C:\Unicam Security”).
    8. You are prompted to download a file namedlicense.nlf”. Download and save this file in the folder where you installed the security and licensing server, (by default “C:\Unicam Security”). Overwrite existing license file if prompted.
    9. Start the Unicam Security and Licensing server. You can do this by simply rebooting the PC/Server, but a reboot is not required. You can also:
      1. Open Control Panel -> Administrative Tools -> Services
      2. Locate and start “Unicam Security and Licensing server

Do a Quick Test

For UniCam FX

  1. Open a UniCam FX client that is pointed to your security server
  2. If you are launching a newly installed client for the first time you may receive an error that no security server could be found. If this happens, close the error message and click on the Options menu in Unicam and select Security Server IP Address and then enter the IP address or hostname for the server where you installed the licensing. Click OK and close Unicam, then re-open UniCam.

For Test Expert

  1. Open a Test Expert client that is pointed to your security server
  2. If you are launching a newly installed client for the first time you may receive an error that the Server did not respond. If this happens, close the error message and click YES on the next Warning message box. A message box will appear asking you to enter the Security Server IP Address or hostname for the server where you installed the licensing. Enter the address or hostname and click OK. Close and restart Test Expert.

Congratulations! You’ve successfully installed your replacement UniCam license file.

Congratulations! You’ve successfully installed your replacement UniCam license file.

We hope this was helpful- if you need further assistance, please don’t hesitate to give us a call at 855-642-2848 Option 2, or use our new support form for prompt assistance.

Thanks for reading,

Dave

Come See Us at DAC 2015!

The Design Automation Conference is coming up soon! Held June 8th-10th at the Moscone Center in San Francisco, the DAC is the oldest and largest conference in electronics manufacturing.

The Acuity Electronics team will be on hand at the Siemens PLM Software booth, Booth 915, to discuss our solutions for test engineering, PCB assembly, manufacturing management and Gerber reverse engineering.

Please stop by and visit us to learn more about our integrated solutions for electronics manufacturing. We look forward to seeing you there!

View Exhibit Map

Tech Tip: Convert Cadence .BRD File from Binary to ASCII for UniCam & Test Expert

Are you having trouble importing a Cadence .BRD file into UniCam FX or Test Expert? If so, this post is for you.

First, a quick explanation on file types:

ASCII vs. Binary

There are 2 types of file formats: ASCII and Binary. (Read more about the differences here.) UniCam and Test Expert accept the ASCII format, and Cadence .BRD files are Binary files. In short, the two are incompatible. However, we have a solution to convert from binary to ASCII.

Change Binary to ASCII with Siemens Extract Script

Lucky for us, Siemens knows that this is a real headache for our customers, and they have made an Extract Script utility freely available. This utility must be run on a Cadence Workstation against the BRD file in order to create the necessary ASCII file format.

Find the Installer & Send Folder to Your Customer

The installers are located in default locations:

For UniCam: “C:\Users\Public\Documents\UniCam\CFG\fab_ini\Cadence\EXTRACT”

For Test Expert: “C:\Users\Public\Documents\Siemens\UniCam\TestExpert\FAB\INPUT\Cadence\EXTRACT”

Send your customer a Zip file containing the Extract Folder and have them follow the following steps.

Action Steps for Your Customer

  1. Install utility on the Cadence workstation using the “Cdc2Fab Setup.msi” file found in the EXTRACT folder.
    1. For UNIX based Cadence workstations, extract the appropriate zip file for your UNIX version and follow the instructions in the provided “readme” file.
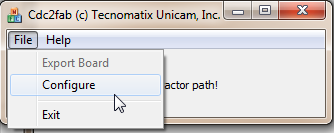
  2. Launch the utility and from the File menu, select Configure.

BRD binary to ASCII 1

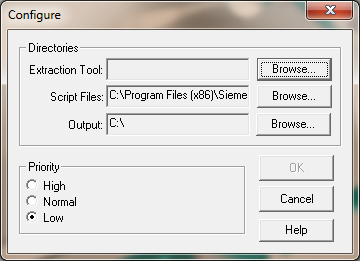
3. Set the paths for the 3 fields (see below)

  1. Extraction Tool: points to where the “Extracta.exe” is located on the Cadence workstation
  2. Script Files: should already be set correctly by the installer
  3. Output: points to where you want it to create the ASCII output file. Usually a temporary location like “C:\Temp” where you can grab it and move it from there easily to a permanent location.

BRD binary to ASCII 2

4. From File menu, select Export Board and select the .BRD file you want to export.

We hope you found this helpful. If you need further assistance or have any questions, please don’t hesitate to contact us. We look forward to serving you.

Thanks for reading,

-Jim

Increase Yields from ICT Results with Test Expert Repair Station

Your test equipment can do more than just detect a defect. Capture data, accelerate repairs, identify trends and increase yields with Test Expert Repair Station from Siemens PLM Software.

I’m curious. How much did your tester cost you? $500K (or somewhere in that ballpark)? And what does it do for you? Just find defects? If so, I imagine it’s hard to quantify its return on investment, other than “testing is critical to our business.”

Your Test Equipment Can Do So Much More

Your test equipment can do so much more than detect defects. Get real-time results to your technicians while providing complete management visibility through live, web-based reporting to:

  • Troubleshoot errors
  • Trigger trend alarms
  • Initiate root cause analysis

Test Expert Repair Station Does All That and More

Test-Expert-Repair-StationWith the ability to connect to virtually any ICT, Flying Prober or AOI / X-Ray Tester, Test Expert Repair Station bridges the gap between what your tester detects and how the information is used downstream.

The intuitive graphical interface presents your circuit board for easy analysis and disposition of defects, PCB debug, and cross-probing between layout and schematic view. The solution includes a Repair Advisor to give a statistical analysis of actions taken on defect codes against specific board components. KPI-related data is readily available from your test equipment to evaluate historical or in-process quality data.

To learn more about Test Expert Repair Station, please contact us. We look forward to hearing from you!